The DBMS_CLOUD package provides database routines for working with cloud resources and it is included by default in all the Autonomous databases on OCI.
Routines provided by DBMS_CLOUD allows you to interact with multiple object storage objects in the cloud including OCI Object Storage, AWS S3 Buckets and Azure Blob Storage buckets.
Oracle 21c is now available for On-Premise installations and although DBMS_CLOUS is not included, we can install it manually and use it the same way as an Autonomous version.
One of the new features of Oracle 21c allows you to use Data Pump for directly export data to a OCI Object Storage, also, we can Import data from OCI Object Storage, AWS S3 and Azure Blob Storage.
In this article I will describe the process of importing data from an AWS S3 bucket using Oracle 21c On-Prem, Data Pump and DBMS_CLOUD.
Creating an AWS S3
From the AWS Console, go services menu, Storage and S3. Click Create Bucket.
Enter the bucket name, bucket name must be globally unique and must not contain spaces or uppercase letters.
Chose the AWS region and click Create Bucket.
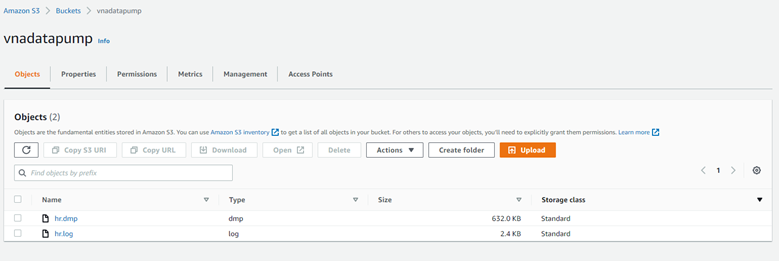
For this example, I created a bucket called vnadatapump and manually uploaded two files:
- dmp: a Data Pump export of the HR schema included in the example schemas in an Oracle Database.
- log: a Data Pump log of the export job
AWS User and privileges
From the AWS Console, go services menu, Security, Identity, & Compliance and IAM. Go to the Users menu and click Add Users button.
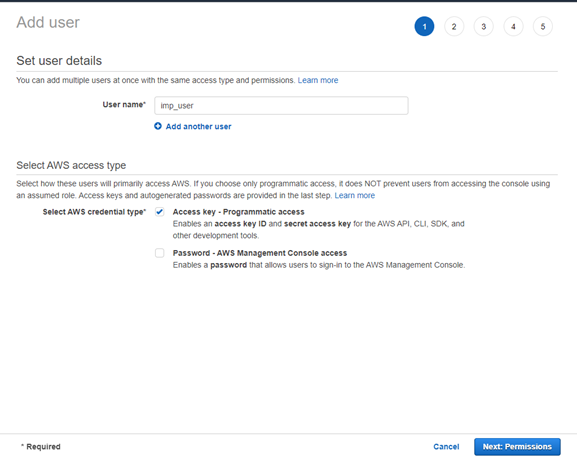
Enter the User name and check the option Acces Key – Programmatic Access to enable an Access Key Id. We will use the Access Key ID later fot the DBMS_CLOUD configuration.
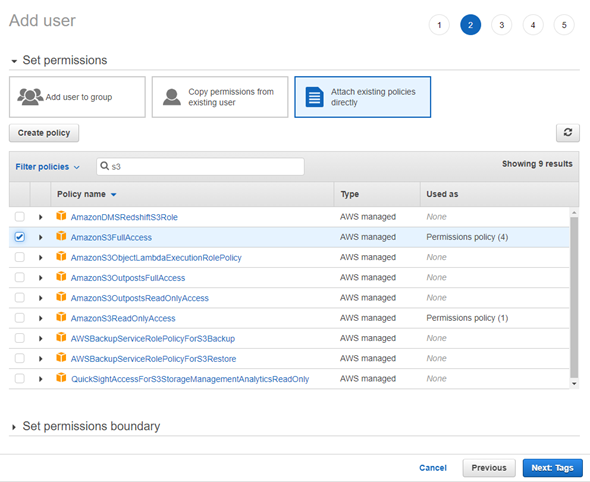
In the next step, select Attach Existing policies directly and check the AmazonS3FullAcces policy. You can use the search bar to find the policy.
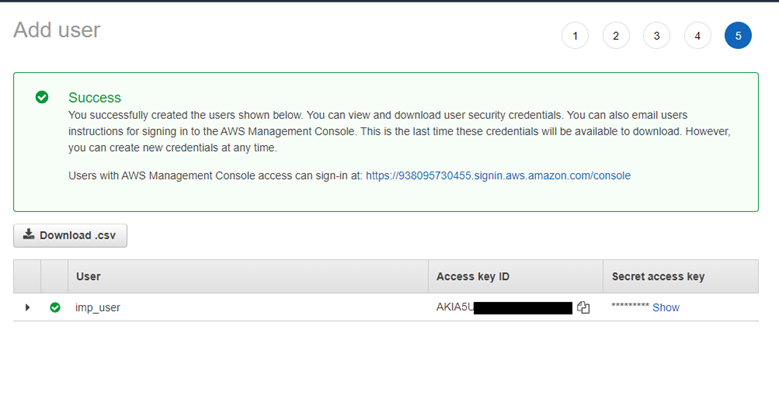 Leave all the remaining options as default and click Create User. You will see a screen with the user details. Download the .csv file with the Access Key ID and value. For purposes of this example, I will use the following data:
Access key ID: AKIA5U2W123L27UB5RFA
Secret access key: eXWPlCOU+rtfKAuVaTAsdBPWg2moeidksC711x+N
DBMS_CLOUD configuration
We are ready to create our credential and use it for Data Pump imports. First step, as we are using Oracle 21c On-Prem, DBMS_CLOUD is not installed by default. We must install it manually.
Follow the instruction in the MOS Note bellow to correctly install the package:
How To Setup And Use DBMS_CLOUD Package (Doc ID 2748362.1)
Once installed, don’t forget to create a Database User with the correct privileges to use DBMS_PACKAGE:
SQL> create user CLOUD_USER identified by passd1#;
SQL> grant create session to cloud_user;
SQL> grant resource to cloud_user;
SQL> alter user cloud_user quota unlimited on users;
SQL> grant EXECUTE on dbms_cloud to cloud_user;
DBMS_CLOUD Credential
Log in as CLOUD_USER user and use the function CREATE_CREDENTIAL to create an AWS credential.
BEGIN
DBMS_CLOUD.CREATE_CREDENTIAL(
credential_name => 'imp_user',
username => ' AKIA5U2W123L27UB5RFA',
password => ' eXWPlCOU+rtfKAuVaTAsdBPWg2moeidksC711x+N'
);
END;
/
Testing the DBMS_CREDENTIAL
In your AWS Console, go to your bucket and then select any of the files. In the Properties tab you will find an Object URL. Copy that URL and use replace it in the following query:
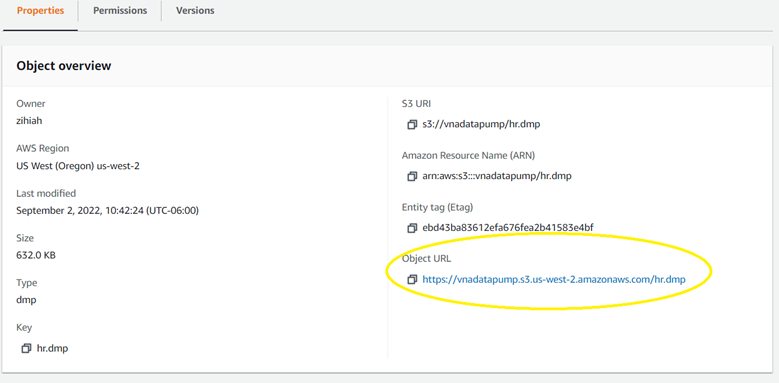
Remove the Object name and leave only the bucket’s URL:
SQL> select * from dbms_cloud.list_objects('imp_user', 'https://vnadatapump.s3.us-west-2.amazonaws.com');
As the result of the query, you will see the list of objects inside the bucket:

Import data from S3 using Data Pump
Create a local directory to store Data Pump log files.
SQL> create or replace directory impdir as '/home/oracle/impdir';
SQL> grant read, write on directory impdir to cloud_user;
I executed the following Data Pump Import job:
impdp cloud_user/passd1#@vnapdb1 \
schemas=hr \
credential=imp_user \
dumpfile=https://vnadatapump.s3.us-west-2.amazonaws.com/hr.dmp \
logfile=impdp_hr.log
Unfortunately, I got the following error message:
ORA-39001: invalid argument value
ORA-39000: bad dump file specification
ORA-31640: unable to open dump file "https://vnadatapump.s3.us-west-2.amazonaws.com/hr.dmp" for read
ORA-27037: unable to obtain file status
Linux-x86_64 Error: 2: No such file or directory
Additional information: 7
The error is caused by a bug already reported by Oracle in the MOS Note (Doc ID 2806178.1)
In order to fix the issue, execute the following commands:
# Turn everything off.
dbshut $ORACLE_HOME
cd $ORACLE_HOME/rdbms/lib
make -f ins_rdbms.mk opc_on
# Turn everything on.
dbstart $ORACLE_HOME
I executed the Data Pump import job again and everything is working fine now:
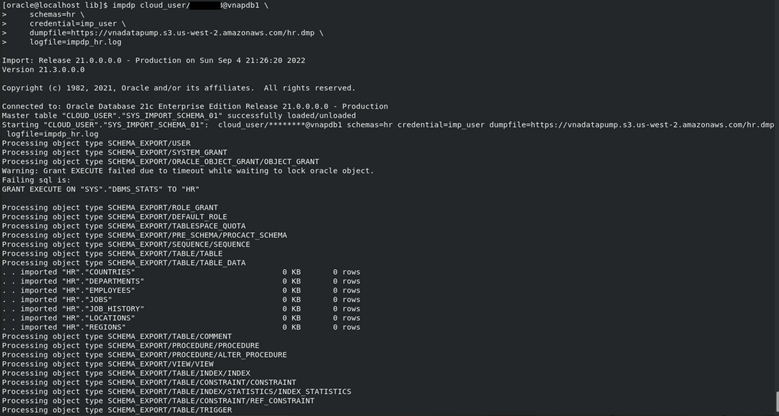

This way, we can import data directly from an AWS S3 bucket. Data Pump is only one of the options we have for interacting with external data. DBMS_CLOUD also provides functions able to copy data and create external tables. For example.
Copying data from S3 and insert it in an Oracle Database table:
BEGIN
DBMS_CLOUD.COPY_DATA(
table_name => 'myTable',
credential_name => 'imp_user',
file_uri_list => ' https://vnadatapump.s3.us-west-2.amazonaws.com/data.txt',
format => json_object('delimiter' value ',')
);
END;
/
Or Creating and external table using data from a S3 bucket:
SQL> BEGIN
DBMS_CLOUD.CREATE_EXTERNAL_TABLE(
table_name => 'myexternal',
credential_name => 'imp_user',
file_uri_list => ' https://vnadatapump.s3.us-west-2.amazonaws.com/data.csv',
column_list => 'id NUMBER, descruption VARCHAR2(40)',
format => json_object('delimiter' value ',')
);
END;
/
Summary
- DBMS_CLOUD is a powerful tool for interacting with Cloud Storage resources. Complete all the steps described in the MOS Doc ID 2748362.1 for a proper configuration.
- Remember that direct Data Pump Imports are available from any Cloud provider (Oracle, AWS, Azure, etc.), but direct Exports are available only to OCI Storage Buckets (for now).
- The instructions in this article are assuming you have all the necessary network and security settings to access your cloud provider from the database server.
- The bug found during the process is affecting Oracle 21.3 and Oracle 21.4 release updates. The described workaround is necessary for these versions.
SUBMIT YOUR COMMENT