
Denying AI Exposure to Sensitive Data with Real Application Security (RAS) – Part 1
Thinking about building a chatbot with Generative AI or RAG? Or even enabling Agentic AI for your applications? You’d better think first about how you’re going to ensure your most sensitive structured data - as well as your vectorized unstructured data - remains invisible to the general public. Fortunately, that’s simple to do with one of Oracle Database 26ai’s least known toolsets: Real Application Security (RAS).
Welcome To a Security Nightmare.
You’ve just joined a seasoned team of Oracle DBAs responsible for managing data security within the Chicago Police Department (CPD), and you’ve inherited a thorny new set of issues. The Chief of Police has a mandate from the new Mayor to implement an AI-enabled chatbot that’ll access public and private information about crimes committed within the city.
The Chief wants to make it simpler for authorized personnel – district commanders, detectives, cops on the beat, criminologists, crime reporters, researchers, and community groups – to review data on crimes dating back to 2001.
The basic ERD in Figure 1 shows how crime data is organized within the CPD schema, and the callouts give you some idea of the complexity of the data security policies you’ll need to implement to ensure each user only sees the data they’re permitted to see.
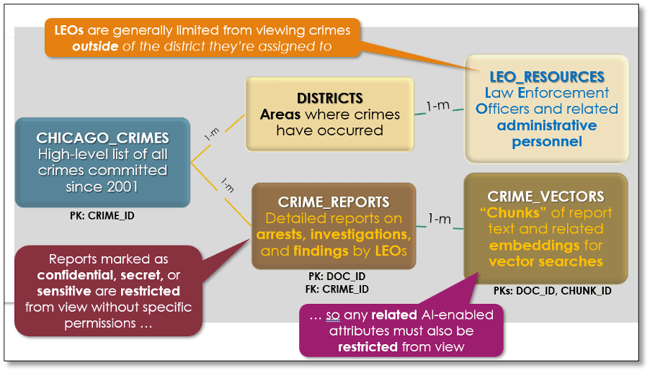
Figure 1. Chicago Police Department (CPD) Schema and Security Requirements
Even with only five database objects, implementing data security requirements already looks a bit tricky. Imagine the difficulties of building a security strategy via a series of database views that restrict viewing only specific rows within some tables for each user based on which district(s) they are currently assigned to, while simultaneously hiding content of specific columns within other tables.
And here’s another less obvious but crucial requirement. You’ll need to be able to immediately reassign security privileges when a LEO or other user suddenly loses or gains district assignments, or must be restricted from content marked as sensitive, secret, or confidential.
We’ve all watched enough police procedurals to imagine a situation when a LEO is suddenly under investigation for bribery and needs to be blocked from seeing internal affairs reports on their potentially illicit activity. Or what about a copper whose close friend has been accused of domestic violence, and that friend wants to find out what the victim reported, or even in which shelter the victim now resides?
In either case, the implications of poor security administration are potentially devastating.
Fortunately, you’ve read this article, so you know exactly what to do: implement Real Application Security (RAS).
Riding RAS To the Rescue
I first really delved deeply into RAS about three years ago during a stint as a DBA for an Oracle Database 19c project, which already tried to implement VPD with limited success and which had rather complex data security requirements spanning dozens of tables, views, and materialized views. RAS has been available since Oracle Database 12cR1, and it’s a worthy and robust successor to Virtual Private Database (VPD) introduced in Oracle 8i.
The good news is that if you’re working with APEX 24.2 and Oracle Database 26ai, RAS is easier to implement than ever, and it’s perfect for limiting access to data at both the row and column level with APEX applications. Figure 2 shows the workflow I’ve followed to implement the chatbot solution we’ll use for this article.
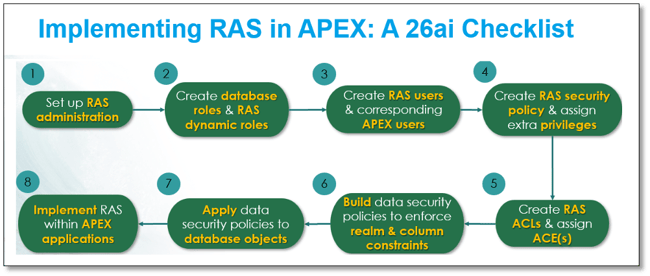
Figure 1. RAS and APEX: 26ai Implementation Strategy
Prerequisites and Assumptions
The rest of this article assumes the following prerequisite steps have already been completed:
- A 26ai Autonomous Database (ADB) has already been created.
- The CPD schema has already been created, populated with data, and all constraints and indexes have been applied.
- An APEX workspace named CPD is already created, and a basic APEX application already exists within that workspace.
Step 1: Set Up RAS Administration
Since I’m working on an OCI-based 26ai autonomous database, I’ll use the ADMIN account as my RAS administrator account. I could also create a separate account – say, RASADM – to handle this if I wanted to further isolate security administration to another user. Figure 3 shows how to grant the ability to provision RAS and administer corresponding RAS security policies to ADMIN.
BEGIN
 XS_ADMIN_CLOUD_UTIL.GRANT_SYSTEM_PRIVILEGE('PROVISION','ADMIN'
 XS_ADMIN_CLOUD_UTIL.GRANT_SYSTEM_PRIVILEGE('ADMIN_ANY_SEC_POLICY','ADMIN’);
END;
Figure 3. Configuring ADMIN User Account for RAS Administration
Next, I’ll create table RAS_SECURED_USERS within the CPD schema to hold RAS-specific information about each application user (Figure 4).
DROP TABLE IF EXISTS cpd.ras_secured_users PURGE;
CREATE TABLE IF NOT EXISTS cpd.ras_secured_users(
   rsu_username VARCHAR2(25) NOT NULL
   ,rsu_keytype   VARCHAR2(12) NOT NULL
   ,rsu_keyvalue VARCHAR2(12) NOT NULL
   ,rsu_comment   VARCHAR2(128)
);

ALTER TABLE cpd.ras_secured_users
 ADD CONSTRAINT ras_secured_users_pk
 PRIMARY KEY (rsu_username, rsu_keytype, rsu_keyvalue)
 USING INDEX (
   CREATE UNIQUE INDEX cpd.ras_secured_users_pk_idx
       ON cpd.ras_secured_users (rsu_username, rsu_keytype, rsu_keyvalue)
   );
I’ll initially populate this control table with data for each user. Figure 5 shows entries for just a few users:
- LSNELLING is the current Chief of Police, so they have access to all CPD Districts, have permission to view data in restricted columns, and permission to view rows at all four security levels.
- Meanwhile, SNGUYEN, a research assistant, only has access to data in a few districts but can see report information at all four security levels.
- NKURCHAWSKA, a student research assistant, is granted extremely limited privileges in a few districts and cannot view any report information.
- Finally, user WJACKSON has extremely limited permissions as they’ve recently been reassigned to a new district because of ongoing Internal Affairs investigations, and have extremely limited report viewing permissions.
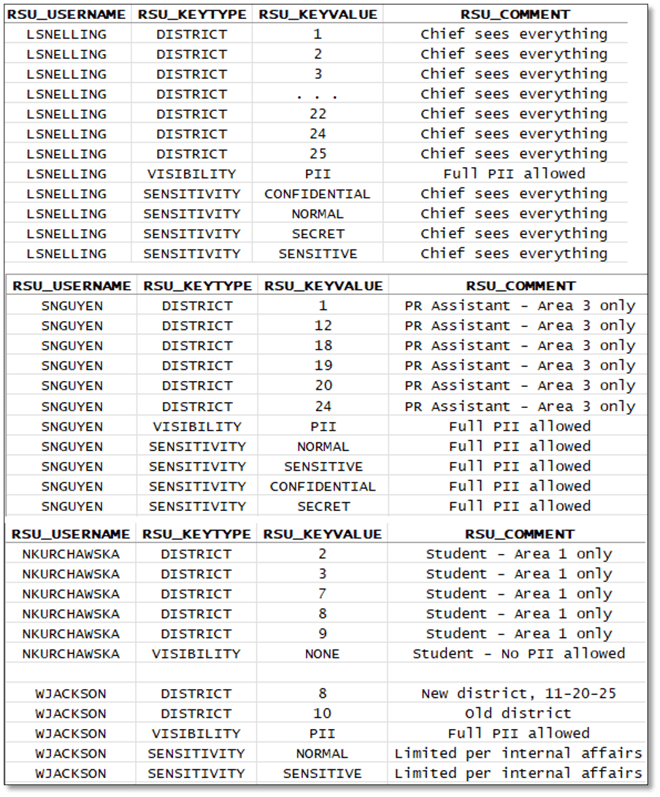
Figure 5. RAS User Permissions
We’ll eventually look at how these permissions limit access to specific features within our APEX application, especially from performing RAG-enabled chatbot operations.
Step 2: Create Database Roles and RAS Dynamic Roles
To give RAS access to specific tables within the CPD schema, I’ll create three roles that grant different levels of privileges of database objects, as shown in Figure 6.
DROP TABLE IF EXISTS ev_charging_stations PURGE;

CREATE ROLE cpd_readonly;
GRANT SELECT ON cpd.chicago_crimes    TO cpd_readonly;
GRANT SELECT ON cpd.cpd_districts     TO cpd_readonly;
GRANT SELECT ON cpd.iucr_codes        TO cpd_readonly;
GRANT SELECT ON cpd.leo_resources     TO cpd_readonly;
GRANT SELECT ON cpd.crime_reports     TO cpd_readonly;
GRANT SELECT ON cpd.crime_vectors     TO cpd_readonly;
GRANT SELECT ON cpd.ras_secured_users TO cpd_readonly;<

CREATE ROLE cpd_fulldml;
GRANT cpd_readonly                                    TO cpd_fulldml;
GRANT INSERT, UPDATE, DELETE ON cpd.chicago_crimes    TO cpd_fulldml;
GRANT INSERT, UPDATE, DELETE ON cpd.cpd_districts     TO cpd_fulldml;
GRANT INSERT, UPDATE, DELETE ON cpd.iucr_codes        TO cpd_fulldml;
GRANT INSERT, UPDATE, DELETE ON cpd.leo_resources     TO cpd_fulldml;
GRANT INSERT, UPDATE, DELETE ON cpd.crime_reports     TO cpd_fulldml;
GRANT INSERT, UPDATE, DELETE ON cpd.crime_vectors     TO cpd_fulldml;
GRANT INSERT, UPDATE, DELETE ON cpd.ras_secured_users TO cpd_fulldml;

CREATE ROLE cpd_pii_limited;
GRANT SELECT ON cpd.chicago_crimes    TO cpd_pii_limited;
GRANT SELECT ON cpd.cpd_districts     TO cpd_pii_limited;
GRANT SELECT ON cpd.iucr_codes        TO cpd_pii_limited;
GRANT SELECT ON cpd.leo_resources     TO cpd_pii_limited;
GRANT SELECT ON cpd.crime_reports     TO cpd_pii_limited;
GRANT SELECT ON cpd.crime_vectors     TO cpd_pii_limited;
GRANT SELECT ON cpd.ras_secured_users TO cpd_pii_limited;
Figure 6. Creating Database Roles and Granting Permissions
It’s time to create our very first RAS objects. There are three dynamic roles that we’ll use a bit later to assign privileges to RAS users as they log into the APEX application. Note that we grant each RAS dynamic role corresponding access to database objects with simple grants (Figure 7).
BEGIN
   SYS.XS_PRINCIPAL.CREATE_DYNAMIC_ROLE(
      name        => 'CPD_DYN_FULL_ROLE'
     ,duration    => NULL
     ,scope       => XS_PRINCIPAL.SESSION_SCOPE
     ,description => 'Dynamic Role - permits full SELECT access and DML access

                     to all data, including viewing sensitive data in crime

                     reports and vectorized embeddings'
     ,acl         => NULL
   );
   SYS.XS_PRINCIPAL.CREATE_DYNAMIC_ROLE(
      name        => 'CPD_DYN_PII_ROLE'
     ,duration    => NULL
     ,scope       => XS_PRINCIPAL.SESSION_SCOPE
     ,description => 'Dynamic Role - permits full SELECT access to all data,

                     +including+ viewing sensitive crime reports and any related

                     VECTOR embeddings based on permitted sensitivity level(s)'
     ,acl         => NULL
   );
   SYS.XS_PRINCIPAL.CREATE_DYNAMIC_ROLE(
      name        => 'CPD_DYN_DWRO_ROLE'
     ,duration    => NULL
     ,scope       => XS_PRINCIPAL.SESSION_SCOPE
     ,description => 'Dynamic Role - permits full SELECT access to all data,
                     but +restricts+ viewing sensitive data in crime reports
                     and vectorized embeddings'
     ,acl         => NULL
   );
END;

GRANT cpd_fulldml     TO cpd_dyn_full_role;
GRANT cpd_pii_limited TO cpd_dyn_pii_role;
GRANT cpd_readonly    TO cpd_dyn_dwro_role;
Figure 7. Creating RAS Dynamic Roles and Granting Them Access to Database Objects
Step 3: Create RAS Users & Corresponding APEX Users
Our APEX application will use APEX-based user accounts to grant access to the application, so we’ll create RAS internal users that will establish connections to our database whenever someone logs into our application (Figure 8), and then create APEX accounts that align to these RAS internal accounts (Figure 9).
DECLARE
 CURSOR curUserIDs IS
   SELECT userid, leo_lname, leo_fname
     FROM cpd.leo_resources;
BEGIN
 FOR u IN curUserIDs
     LOOP
       BEGIN
         SYS.XS_PRINCIPAL.CREATE_USER (
            name         => u.userid
           ,schema       => 'CPD'
           ,description  =>
             'CPD Internal User: ' || u.leo_lname || ',' || u.leo_fname);
           SYS.XS_PRINCIPAL.GRANT_ROLES (grantee => u.userid, role => 'XSCONNECT');
           SYS.DBMS_XS_PRINCIPALS.SET_PASSWORD(
             ,username => u.userid
             ,password => 'S3c-re_P5w0rd’
             ,type => XS_PRINCIPAL.XS_SHA512);
       END;
     END LOOP;
END;
Figure 8. Adding RAS Users to Database
DECLARE
 l_wid APEX_WORKSPACES.WORKSPACE_ID%TYPE;
 CURSOR curUserIDs IS
   SELECT userid, leo_lname, leo_fname
     FROM cpd.leo_resources;

BEGIN
   SELECT workspace_id INTO l_wid FROM apex_workspaces WHERE workspace = 'CPD';
   APEX_UTIL.SET_SECURITY_GROUP_ID(l_wid);
   FOR u IN curUserIDs
     LOOP
         APEX_UTIL.CREATE_USER(
           p_user_name     => u.userid
         ,p_email_address => 'jim.czuprynski@gmail.com'
         ,p_web_password   => 'S3c-re_P5w0rd'
         ,p_change_password_on_first_use => 'N'
         ,p_description   =>
           'CPD Internal User: ' || u.leo_lname || ',' || u.leo_fname
         ,p_account_locked => 'N'
         ,p_developer_privs => NULL
           );
     END LOOP;
     COMMIT;
END;
Figure 9. Adding APEX Application Users
Note that if you wanted to use an existing authentication method – say, MS Active Directory – that’s also eminently doable, but outside of the scope of this article. Check out this blog post on how one of my colleagues tackled that situation.
Step 4: Create RAS Security Policy & Assign Extra Privileges
We’ll now create a RAS security policy named CPD.SECCLS as a container for all RAS security directives (Figure 10). Note the often-missed but important step of adding a specific privilege – here named VIEW_RESTRICTED_PII – that lets me assign the ability to view data stored in specific columns of selected tables.
BEGIN
 SYS.XS_SECURITY_CLASS.CREATE_SECURITY_CLASS(
    name        => 'CPD.SECCLS'
   ,parent_list => xs$name_list('SYS.DML')
   ,priv_list   => NULL
   ,description => 'CPD Security Class');

 SYS.XS_SECURITY_CLASS.ADD_PRIVILEGES(
    sec_class => 'CPD.SECCLS'
   ,priv => 'VIEW_RESTRICTED_PII'
   ,implied_priv_list => XS$NAME_LIST('"SELECT"')
   ,description => 'Permits viewing of restricted crime data within selected tables');
END;
Figure 10. Creating a RAS Security Class
Step 5: Create RAS ACLs & Assign ACEs
RAS uses Access Control Lists (ACLs) to assign specific privileges at the row and column level. Each ACL has at least one Access Control Entry (ACE), as Figure 11 shows.
DECLARE
 aces   XS$ACE_LIST := XS$ACE_LIST();

BEGIN

 aces.EXTEND(1);
 aces(1) :=
   XS$ACE_TYPE(
     privilege_list => XS$NAME_LIST(
       'SELECT', 'INSERT', 'UPDATE', 'DELETE', 'VIEW_RESTRICTED_PII')
     ,principal_name => 'CPD_DYN_FULL_ROLE');

 SYS.XS_ACL.CREATE_ACL(
   name       => 'CPD.SUPR_ACL'
   ,ace_list   => aces
   ,sec_class   => 'CPD.SECCLS'
   ,description => 'CPD Supervisor-Level ACL. Full DML privileges are permitted
                   plus all PII and RAG viewing is permitted’);

 aces(1) :=
   XS$ACE_TYPE(
     privilege_list => XS$NAME_LIST('SELECT','VIEW_RESTRICTED_PII')
     ,principal_name => 'CPD_DYN_PII_ROLE');

 SYS.XS_ACL.CREATE_ACL(
   name       => 'CPD.PII_ACL'
   ,ace_list   => aces
   ,sec_class   => 'CPD.SECCLS'
   ,description => 'CPD PII-Limited ACL. All PII viewing is permitted’);


 aces(1) :=
   XS$ACE_TYPE(
     privilege_list => XS$NAME_LIST('SELECT')
     ,principal_name => 'CPD_DYN_DWRO_ROLE’);

 SYS.XS_ACL.CREATE_ACL(
   name       => 'CPD.DWRO_ACL'
   ,ace_list   => aces
   ,sec_class   => 'CPD.SECCLS'
   ,description => 'CPD Read-Only ACL. No PII or RAG viewing is permitted');

END;
Figure 11. Creating RAS Access Control Lists (ACLs) and Related Privileges
Note that I’ve created three ACLs, one each for the corresponding RAS dynamic roles I established in Step 2, and assigned those roles to their ACL:
- The code in blue gives SUPR_ACL carte blanche access, including SELECT and full DML privileges, as well as the ability to view information in any restricted columns through the VIEW_RESTRICTED_PII privilege we created.
- The code in green gives PII_ACL only SELECT privileges, but also the ability to view sensitive information in any restricted columns via the VIEW_RESTRICTED_PII privilege.
- Finally, the code in purple gives DWRO_ACL only SELECT privileges and limits access to any restricted columns. This lets me enforce the principle of least privilege for any user who isn’t granted access to data via the other two higher-privileged ACLs.
Step 6: Build Data Security Policies to Enforce Realm & Column Constraints
At last, it’s time to get to the meat of RAS data security enforcement: data security policies, or DSPs for short. I’ll create three DSPs aimed at different security levels, starting with the one in Figure 12.
CHICAGO_CRIMES Table
DECLARE
  realms  XS$REALM_CONSTRAINT_LIST  := XS$REALM_CONSTRAINT_LIST();

BEGIN

  realms.EXTEND(3);

  -- SUPR_ACL: Permits full access to all table contents
  -- (no restrictions based on data values)

  realms(1) :=
      XS$REALM_CONSTRAINT_TYPE(
        realm => '1=1'
       ,acl_list => XS$NAME_LIST('CPD.SUPR_ACL')
    );

  -- PII_ACL: Permits access to rows only if CPD.CHICAGO_CRIMES.DISTRICT is found
  -- within a specified subset of values found in CPD.RAS_SECURED_USERS for the
  -- pertinent user account
  realms(2) :=
      XS$REALM_CONSTRAINT_TYPE(
        realm =>
        'DISTRICT IN (
           SELECT RSU_KEYVALUE
             FROM CPD.RAS_SECURED_USERS
            WHERE RSU_KEYTYPE = ''DISTRICT''
              AND RSU_USERNAME = XS_SYS_CONTEXT(''XS$SESSION'', ''SESSION_XS_USER''))'
       ,acl_list => XS$NAME_LIST('CPD.PII_ACL')
    );

  -- DWRO_ACL: Permits access to rows only if if CPD.CHICAGO_CRIMES.DISTRICT is found
  -- within a specified subset of values found in CPD.RAS_SECURED_USERS for the
  -- pertinent user account, and also +RESTRICTS+ viewing of selected PII columns
  realms(3) :=
      XS$REALM_CONSTRAINT_TYPE(
        realm =>
        'DISTRICT IN (
           SELECT RSU_KEYVALUE
             FROM CPD.RAS_SECURED_USERS
            WHERE RSU_KEYTYPE = ''DISTRICT''
              AND RSU_USERNAME = XS_SYS_CONTEXT(''XS$SESSION'', ''SESSION_XS_USER''))'
       ,acl_list => XS$NAME_LIST('CPD.DWRO_ACL')
    );

  SYS.XS_DATA_SECURITY.CREATE_POLICY(
    name                    => 'CPD.CHICAGO_CRIMES_DS'
   ,realm_constraint_list   => realms
   ,column_constraint_list  => NULL
   ,description             => 'Security policy limiting access to CPD.CHICAGO_CRIMES'
  );
END;
Figure 12. Establishing DSP CHICAGO_CRIMES_DS
This first DSP focuses on enforcing restrictions on rows within the CHICAGO_CRIMES table based on which district(s) a user is allowed to access. Here’s a detailed breakdown:
- The code in blue gives carte blanche access to the CHICAGO_CRIMES table via the corresponding CHICAGO_CRIMES_DS data security policy, including SELECT and full DML privileges, as well as the ability to view information in any restricted columns. Note that it’s assigned to ACL SUPR_ACL.
- The code in green applies a predicate to any query accessing a database object with a DISTRICT column for the PII_ACL ACL. It gathers the permitted values by looking them up in the CPD.RAS_SECURED_USERS table for the current RAS user. This permits a user granted PII permission to view sensitive information in any restricted columns. This realm is assigned to ACL PII_ACL.
- Finally, the code in purple does a similar thing, but for the DWRO_ACL ACL. This effectively limits a user who was not granted PII permission from viewing sensitive information in any restricted columns. This realm is assigned to ACL DWRO_ACL.
CHICAGO_REPORTS Table
On to something a bit trickier! The next DSP (Figure 13) enforces restrictions on rows and columns within the table CRIME_REPORTS. It does that by looking up what sensitivity levels are permitted for each user in our RAS control table.
DECLARE
  realms  XS$REALM_CONSTRAINT_LIST  := XS$REALM_CONSTRAINT_LIST();
  cols    XS$COLUMN_CONSTRAINT_LIST := XS$COLUMN_CONSTRAINT_LIST();

BEGIN
  realms.EXTEND(1);
  cols.EXTEND(2);

  realms(1) :=
      XS$REALM_CONSTRAINT_TYPE(
        realm =>
       'SENSITIVITY IN (
    SELECT RSU_KEYVALUE
      FROM CPD.RAS_SECURED_USERS
     WHERE RSU_KEYTYPE = ''SENSITIVITY''
       AND RSU_USERNAME = XS_SYS_CONTEXT(''XS$SESSION'', ''SESSION_XS_USER''))'
       ,acl_list => XS$NAME_LIST('CPD.PII_ACL'));

  cols(1) :=
      XS$COLUMN_CONSTRAINT_TYPE(
          column_list => XS$LIST('SENSITIVITY')
         ,privilege => 'VIEW_RESTRICTED_PII');

  cols(2) :=
      XS$COLUMN_CONSTRAINT_TYPE(
          column_list => XS$LIST('CRIME_DOCUMENT')
         ,privilege => 'VIEW_RESTRICTED_PII');

  SYS.XS_DATA_SECURITY.CREATE_POLICY(
    name => 'CPD.CRIME_REPORTS_DS'
   ,realm_constraint_list => realms
   ,column_constraint_list => cols
   ,description => 'Controls access to CPD.CRIME_REPORTS'
  );

END;
Figure 13. Establishing DSP CHICAGO_REPORTS_DS
- The code in brown establishes the limitations on which rows may be viewed based on the value in the SENSITIVITY column of CRIME_REPORTS.
- The code in purple tells RAS which columns should be permitted to be viewed if, during login, we determine the user has been granted the VIEW_RESTRICTED_PII privilege. If it’s not granted, the user would only see NULL values returned for the column. (And yes - there are ways to customize this behavior in case a NULL value is actually meaningful).
CHICAGO_VECTORS Table
Just one more DSP to declare, and this one is particularly interesting because it uses the foreign key relationship to its “parent” table, CRIME_REPORTS, to limit access to its rows (Figure 14).
DECLARE
  realm   XS$REALM_CONSTRAINT_LIST;
  cols    XS$COLUMN_CONSTRAINT_LIST := XS$COLUMN_CONSTRAINT_LIST();
BEGIN
  cols.EXTEND(3);

  realm := XS$REALM_CONSTRAINT_LIST(
    XS$REALM_CONSTRAINT_TYPE(
     parent_schema => 'CPD'
    ,parent_object => 'CRIME_REPORTS'
    ,key_list =>
        XS$KEY_LIST(
          XS$KEY_TYPE(
             primary_key => 'DOC_ID'
            ,foreign_key => 'DOC_ID'
            ,foreign_key_type => 1))));

  cols(1) :=
      XS$COLUMN_CONSTRAINT_TYPE(
          column_list => XS$LIST('CHUNK_ID')
         ,privilege => 'VIEW_RESTRICTED_PII');

  cols(2) :=
      XS$COLUMN_CONSTRAINT_TYPE(
          column_list => XS$LIST('DOC_CHUNK')
         ,privilege => 'VIEW_RESTRICTED_PII');

  cols(3) :=
      XS$COLUMN_CONSTRAINT_TYPE(
          column_list => XS$LIST('EMBEDDINGS')
         ,privilege => 'VIEW_RESTRICTED_PII');


  SYS.XS_DATA_SECURITY.CREATE_POLICY(
    name => 'CPD.CRIME_VECTORS_DS'
   ,realm_constraint_list => realm
   ,column_constraint_list => cols
   ,description =>
   'Controls access to CPD.CRIME_VECTORS based on
    parent-child relationship TO CPD.CRIME_REPORTS');

END;
Figure 14. Establishing DSP CHICAGO_VECTORS_DS
- The code in green establishes that any row that’s been restricted in the CRIME_REPORTS table by any other DSP is also off limits for the CRIME_VECTORS table. This is an often-overlooked feature of RAS, and one of its most powerful features. Any rows of CRIME_REPORTS that are restricted by their DSP will also not be accessible because of their foreign key relationship.
- Like the prior DSP for CRIME_REPORTS, the code in purple establishes that the contents of three columns cannot be viewed unless the user has been granted the VIEW_RESTRICTED_PII privilege.
Step 7: Apply Data Security Policies to Database Objects
Now for the easy part! I’ll invoke the APPLY_OBJECT_POLICY procedure to apply each of the data security policies built in Step 6 to the corresponding tables.
BEGIN
  SYS.XS_DATA_SECURITY.APPLY_OBJECT_POLICY(
    policy => 'CPD.CHICAGO_CRIMES_DS', schema => 'CPD', object => 'CHICAGO_CRIMES');
  SYS.XS_DATA_SECURITY.APPLY_OBJECT_POLICY(
    policy => 'CPD.CRIME_REPORTS_DS' , schema => 'CPD', object => 'CRIME_REPORTS');
  SYS.XS_DATA_SECURITY.APPLY_OBJECT_POLICY(
    policy => 'CPD.CRIME_VECTORS_DS' , schema => 'CPD', object => 'CRIME_VECTORS');
END;
Figure 15. Applying RAS DSPs to Their Objects
Step 8: Set Up RAS in APEX
Now I’ll get APEX ready to leverage RAS. My first stop: The authentication schemes under Shared Components (Figure 16) in my App Builder session.
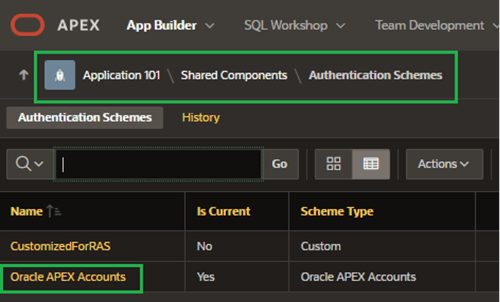
Figure 16. APEX Authentication Schemes
Under the Real Application Security section, I’ll set RAS Mode to Internal Users. This effectively tells APEX to connect to the corresponding RAS user account I set up back in Step 3.
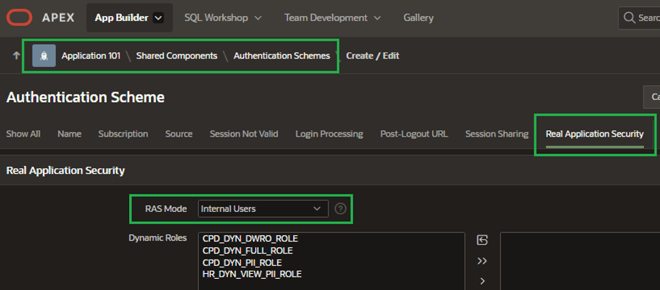
Figure 17. RAS Mode
Remember those dynamic roles I built, way back in Step 2? Here’s where they finally come into play. Now there is a special post-authentication script that assigns an appropriate RAS dynamic role to my application user’s session. To enable the proper role, the procedure queries the RAS_SECURED_USERS table to obtain their visibility level and sets the dynamic role accordingly (Figure 18) via a call to procedure APEX_AUTHORIZATION.ENABLE_DYNAMIC_GROUPS.
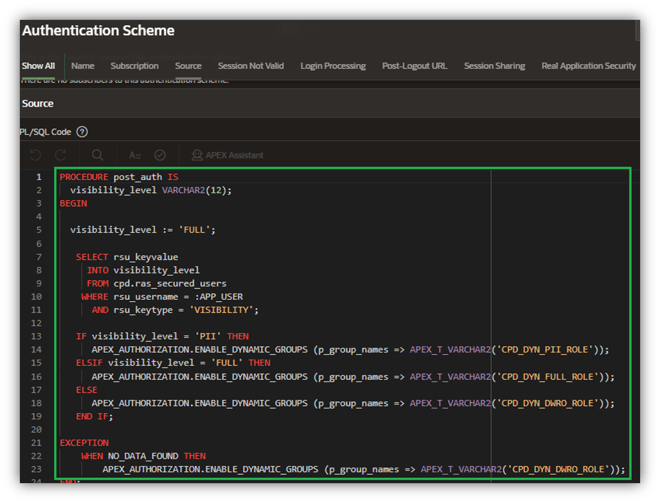
Figure 18. POST_AUTH Post-Login Procedure
Note that if the user hasn’t yet been assigned any visibility level, I enforce the principle of least privilege and refuse to grant them any visibility to the columns I restricted in CRIME_REPORTS and CRIME_VECTORS.
Finally, I’ll enable the POST_AUTH post-authentication procedure (Figure 19).
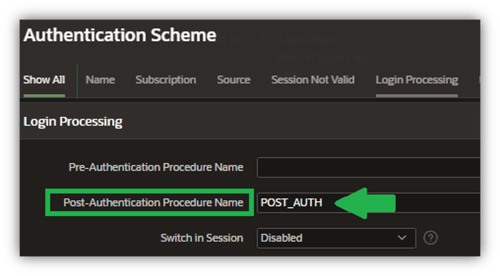
Figure 19. RAS Implementation Steps
Next Steps: Implementing RAS in APEX
If you’re thinking that this has been a lot to absorb, you’re absolutely correct. The good news is that this has been the hardest part.
In the second half of this series, I’ll add generative AI capabilities into my APEX 24.2 application and run through several scenarios to show how RAS limits access to sensitive documents and embeddings from within my SeePD chatbot.
Happy Holidays! 🎄
Ready to Take Your Oracle Skills to the Next Level?
Join OraPub, Viscosity’s training hub for Oracle professionals, packed with expert-led courses and exclusive paid member benefits.
Check out Viscosity’s event page for upcoming virtual and on-site training opportunities.


SUBMIT YOUR COMMENT